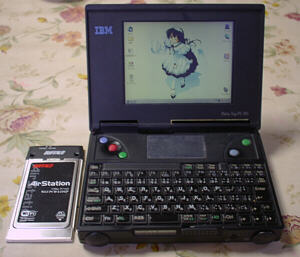
Just like as you look, it's a PDA rather than "ThinkPad notebook".
PalmTopPC110 is developed by past "RIOS system Inc", that was the joint venture project that also developed epoch making ultraportable B5 sized PC "ThinkPad220".
When it was released, not so many people bought this amazing PDA because it's relatively expensive as a PDA. But there are still many manias of PalmTopPC110 now for its fun to customize.
|
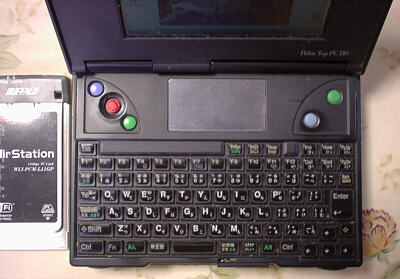 |
This is PalmTopPC110's keyboard.
Its keytops are very small and looks so difficult to type, but actually it's not so.
When I was in working school 3years ago, I often wrote the lecture and what teachers wrote on white board on this PDA with text editor, either those are text or pictures.
|
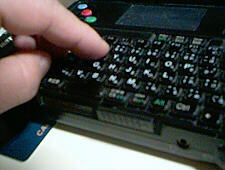 |
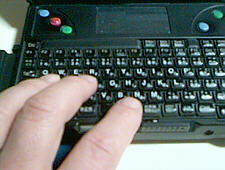
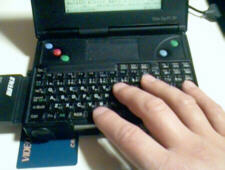
Regard to the "ThinkPad standard" keyboard, I can operate it in blind touch. I use 3thumbs of both hand except #1,#5.
I also often use shortcut key. It's effective not so release my hand from guide key like "F" or "H".
|
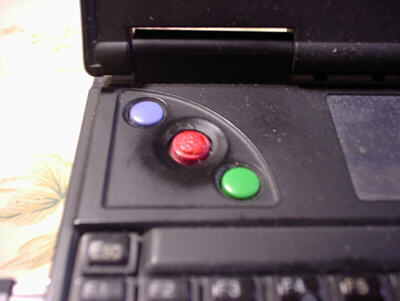 |
Stick pointer of PalmTopPC110.
It has 2sets of botton on both side of keyboard panel so that someone is easy to operate it holding with both hand and standing.
But in fact, I can hardly say it's easy to touch compared with "TrackPoint", because the top of stick pointer is sink and so difficult to move the pointer to the place as I expected.
I cut the top of "TrackPoint cap" and put it on the top of the stick pointer with quick-drying glue.
So, it became much easier to operate than before.
|
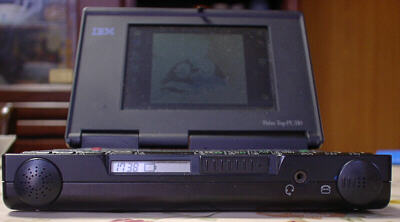 |
Front panel of PalmTopPC110.
Information on LCD panel changes by pressing Fn+V(Time/Power to remain/Alternative of both).
Standby switch is in the front panel. it can charge battery only when the system is suspended, but "Ultracharger for PT110" can make the system charge the battery during the operation.
2circles of both side is microphone/reciever of telephone. PalmTopPC110 has "telephone function" with pre-installed program "Personaware". when you slide the right circle to the right the telephone is on hook.
|
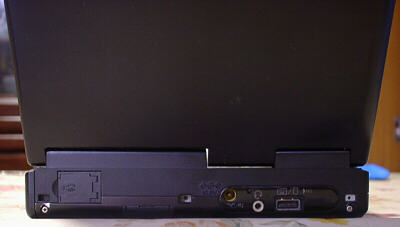 |
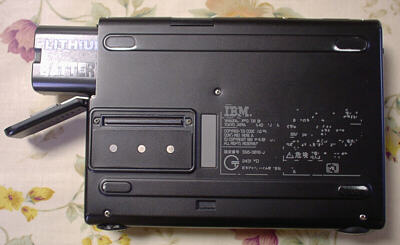
Back panel of PalmTopPC110.
I heard the small switch upper from the headphone connector isn't a reboot switch, but a discharge botton of battery.
There is a screw hole under the panel on the edge of right. It was holed for fastening strap, but it was called off because of the lack of strength.
|
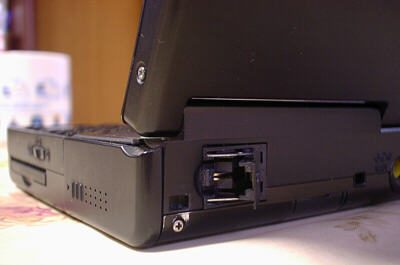 |
PalmTopPC110 has a 2.4kbps internal modem with X-jack.
It looks very slow and has no use. There was a 33.6kbps modem upgrade kit before, but today it's rare to be seen.
But for PalmTopPC110 has common I/Fs like PCMCIA, it's not so unconvinient.
|
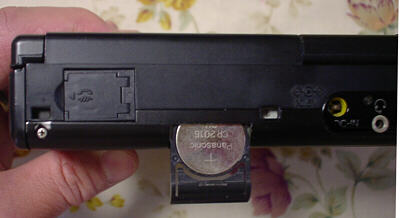 |
PalmTopPC110 has 3 batteries. Li-ion main battery packs, Li-ion internal battery for power supply to RAM during stanby and botton-shaped battery for CMOS backup.
The last one is installed here. The size is CR2016.
|
 |
Right side of PalmTopPC110.
Li-ion battery pack is installed from this side.
In default setting, Panasonic's Graphite Li-ion battery pack is available. So when you use Sony's coaks Li-ion pack, the running time becomes very short.
If you use this packs, you must set BIOS with ps2.exe below;
[ps2 @batt o]
If you set it back to default, you'll do like below;
[ps2 @batt s]
If you use PalmTopPC110 with AC adaptor, you'd better take off the pack, because the audio speaker is installed in the cover of battery slot.
when the sound plays without the pack, the "dome effect" of empty slot enriches the sound.
The small switch over the "Smart-Pico Flash" slot is ring off/on switch.
|
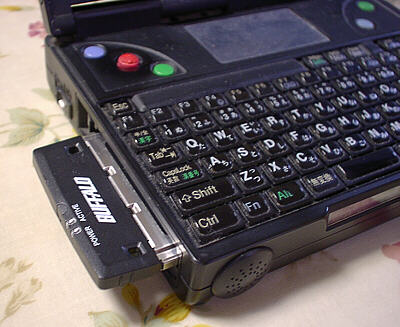 |
Left side of PalmTopPC110.
Although PT110 is very small, it has 2slots of PCMCIA type2 I/Fs. Due to this , still now PalmTopPC110 is very variable to use it with many PCMCIA devices.
In those days when the compact flash card is so expensive, some manias succeeded in installing the type3 HDD card within this 1slot and another slot remained available!!....it's the magic indeed.
|
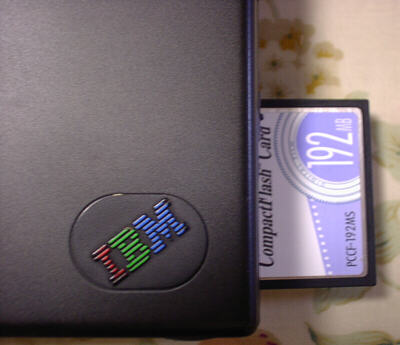 |
....And today, we can get the big capacity of CompactFlash cards in reasonable price, it become very easier to operate the PalmTopPC110 with heavy OS like windows95/98.
There were 20MB of memory module from third party(century). But some manias customized normal 8MB of memory module up to 24MB and internal 4MB up to 8MB, by "Kame-Kame technique"("turtle on turtle" in English)....mounting memory chip on another one in pararell.
When the memory is upgraded to this, Windows9x and applications works very smoothy.
|
 |
The bottom of PalmTopPC110.
There is a port replicator(Many user calls it "Potoli") connector.
It isn't "hot-plug". So you must turn off or stand by the system before you connect PalmTopPC110 to Port Replicator.
When you put off the bottom cover, there is a memory module. Under the module, The code name of PT110 "Monolith" appears on the system board.
|
 |
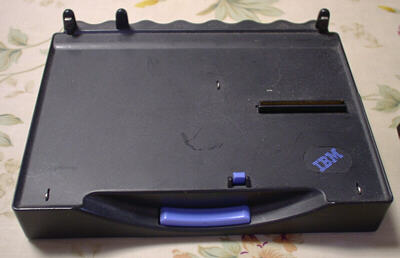
This is the Port Replicator(Potoli).
Potli is relatively easy to get in the parts of PalmTopPC110, but if you have another ThinkPad that can boot up from PCMCIA storage device, it's not nessesory for installing OS.
|
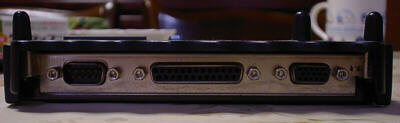 |
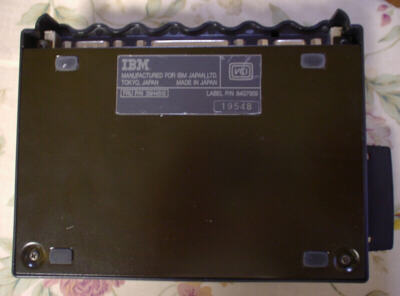
Back panel of Potoli.
|
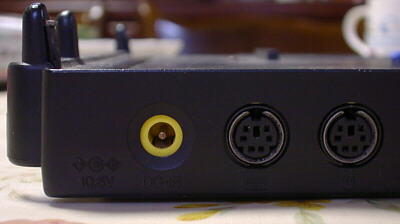 |
Left side of Potoli.
|
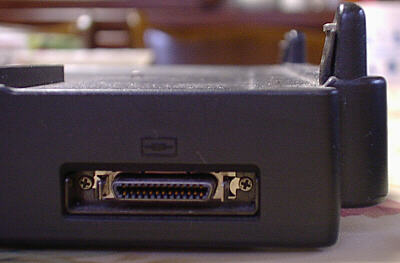 |
Right side of Potoli.
FDD for other ThikPads like ThinkPad230/530/535 can connect this and work, but with these FDD, the system can't boot up from floppy.
|
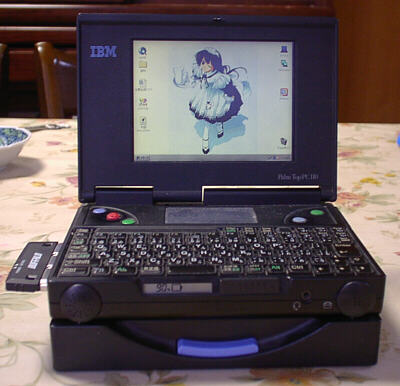 |
The shape of PalmTopPC110 connected to Potoli.
Potoli is almost as big as PalmTopPC110, So We hoped if it had been a little smaller when we saw it.
|
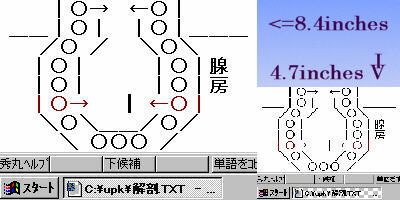 |
The screen image of PalmTopPC110.
Its 4.7inchDSTN panel can't be seen at all outdoor when it's fine, but it looks not so bad in the room.
But it can't be helped that the panel is much smaller than notebookPC.
If you use and love this computer, please take care of your eyes...
|
**** How to dismantle PalmTopPC110 (partially) ****
During you use PalmTopPC110, sometimes your PalmTopPC110's LCD panel lean down easily. It's caused by "the dislocation" of the hinge.
To remend this, you need to dismantle the PalmTopPC110 to adjust the angle of right axis of the hinge. This is like below;
|
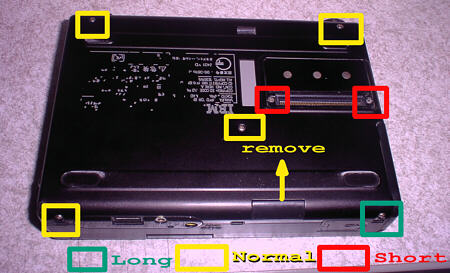 |
First of all, remove power battery pack and Li-ion battery for BIOS.
And loosen 7 screws in those square areas.
The length of each screws are different. Please note the positions of screws not to make mistake fastening different screws and break holes.
When "Bottom case (Parts#40)" is removed, you can access "memory module (Parts#44)" to upgrade it or see "MONOLITH", the code name of PalmTopPC110 on the system board which is covered with memory module.
|
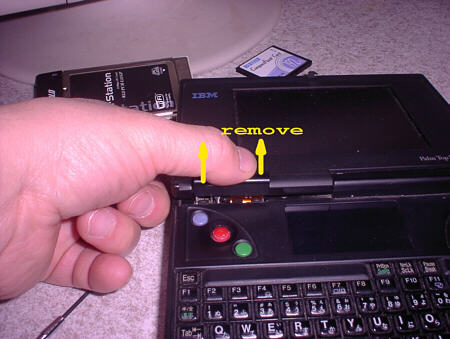 |
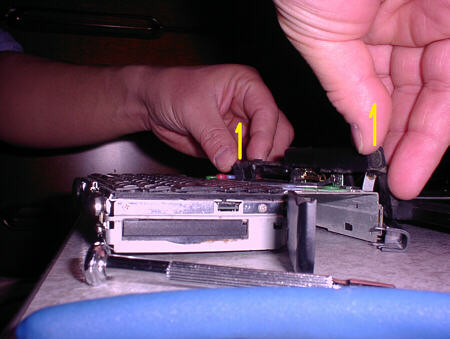
Remove the plastic hinge cover (Parts#12) over LCD flexible cable.
This is fastened small hooks. So please take care not to break them.
|
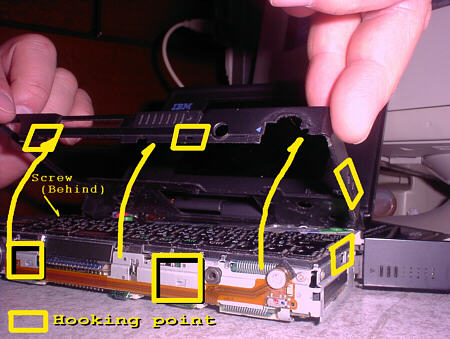 |
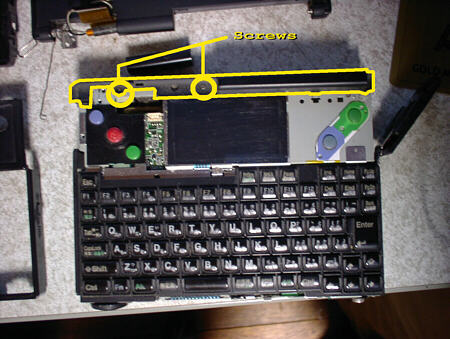
Loosen a screw fastening keyboard frame (Parts#36:keyboard case) and remove it.
There are several very small hooks on those square areas on a keyboard frame, power switch on the left side and hooking switch on the right side. If you enforced to remove it, the switch spring should be put off and you may miss it.
|
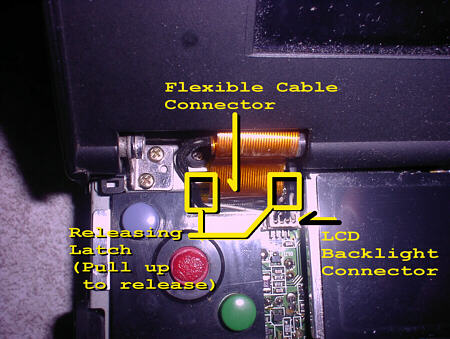 |
The LCD panel is connected with system board by two connectors under the keyboard frame.
To disconnect the flexible cable (LCD Flat Printed Cable [Part#6]) from systemboard, you need to pull up the latches on both sides of flexible cable connector simultaneously.
|
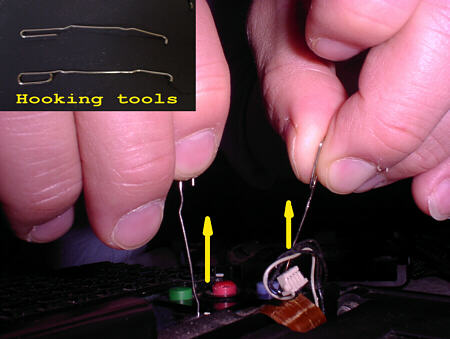 |
So you'd better pull up the latches using such hooking tools those are made of gem clips. You'll pull them up easily to disconnect the flexible cable.
|
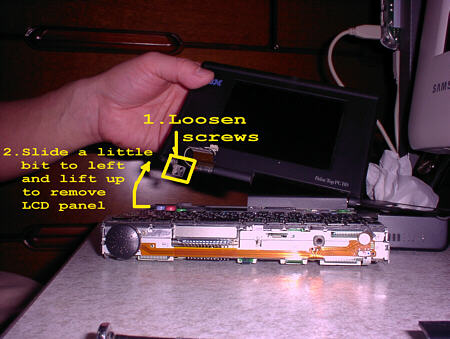 |
When the cables are disconnected, you can remove LCD panels from the main frame. Loosen 2 screws those fasten the LCD panel, and slide the LCD panel just a little bit to the left and lift up the left side. And then, the panel can be removed.
After you remove LCD panel from main frame, you can access flexible cable connector on LCD unit by loosening 4screws on both sides of LCD panel and detouching "LCD case (Parts#11)" to change flexible cable for new one.
|
 |
The hinge axis on the main frame is covered with "Hinge case(Parts#13)".
This case is fastened with 2screws in those square areas.
|
 |
Remove "Hinge case" carefully, using a micro screw driver to take off hooks.
|
 |
Then the hinge axis appears on the right side over main frame.
Check the angle of axis. If it leans toward the left, "the dislocation of hinge" is occured.
Correct the angle of it vertically or so that it leans just a little bit toward the right. Then you resemble it, the move of LCD should panel becomes tight and stable.
|
Others:
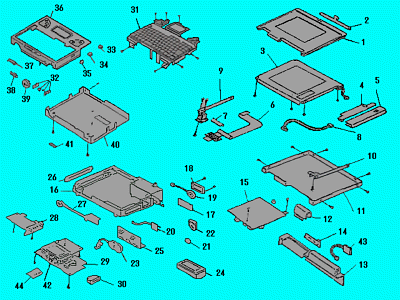
PalmTop110 FRU
| -This list is based on "PC110 FRU list" by Mr. Yasuhide Seki(this list is uploaded in @nifty/fibmtp1/dl2) and presented in my website with his agreement.- |
| Parts name |
FRU P/N |
Screw M1.6 x 2.5
Screw M1.6 x 3
Screw M1.6 x 4
Screw M1.6 x 1.5 |
39H5794
39H5795
39H5796
39H5797 |
| 1.LCD Bezel |
39H5779 |
| 2.Lock Plate |
39H5782 |
| 3.LCD Panel Assembly |
39H4554 |
| 4.Inverter Component |
39H4560 |
| 5.Inverter Insulator Plate |
39H5763 |
| 6.LCD Flat Printed Cable |
39H5775 |
| 7.LCD Flat Printed Cable Clip |
39H5777 |
| 8.Inverter Cable |
39H5776 |
| 9.LCD Hinge. Left |
39H5781 |
| 10.LCD Hinge. Right |
39H5780 |
| 11.LCD Case |
39H5778 |
| 12.Hinge Cover |
39H5789 |
| 13.Hinge Case |
39H5788 |
|
|
14.Rear Cover |
39H5792 |
| 15.Modem PCB Component |
39H4553 |
| 16.Main Frame Component |
39H4548 |
| 17.Battery Cover A |
39H5783 |
| 18.Battery Cover B |
->17 |
| 19.Speaker Component |
->17 |
| 20.RTC PCB Component |
->16 |
| 21.RTC Lithium Battery |
"CR2016" |
| 22.RTC Cover |
39H5791 |
| 23.Sub-Battery Component |
39H5786 |
| 24.Lithium-Ion Battery |
39H4517 |
| 25.Sub-Battery Holder |
->16 |
| 26.PCMCIA Shutter Component |
39H5787 |
| 27.Telephone FPC Component |
->16 |
| 28.DC/DC Converter Component |
39H4552 |
| 29.Main PCB Component 84G7950 |
| 30.C/F Shutter Component |
39H5785 |
| 31.Keyboard Assembly |
39H4542 |
| 32.Power Button Component |
->40 |
| 33.Select Button. Right(Green) |
->36 |
| 34.Select Button. Left(Blue) |
->36 |
| 35.Ringing Button |
->36 |
| 36.Keyboard Case |
39H4545 |
| 37.Statur LCD Cover |
->36 |
| 38.LCD Lock Button |
->36 |
| 39.Microphone Cover |
39H5790 |
| 40.Buttom Case |
39H4546 |
| 41.S/N Label |
39H5793 |
| 42.PCMCIA Slot |
39H5784 |
| 43.Wing Jack Assembly |
39H4559 |
| 44.4MB memory module |
39H4525 |
 |
|
| IBM in town |
| My ThinkPads |